Facts
- Elevation: 3,371 m (11,060 ft)
- Prominence: 2,628 m
- Ribu category: Sangat Tinggi
- Province: Jawa Tengah (Central Java)
- Google Earth: kml
- Rating:

 (20 votes) Add your rating
 Loading...
 - Other names: none.
- Eruptions: 1730(?)
Photos


Bagging It!
This huge mountain is separated from its similarly conical neighbour, Gunung Sindoro, by the Kledung Pass (1,400m) and is the second highest peak in Central Java. Its only known eruption was in 1730 but there is still minor volcanic activity in the crater.
It is most commonly climbed from the north from the basecamp at Garung village, which is very near to Kledung where there is a decent hotel. Public transport from Yogya is frustratingly slow so the area is better approached from Semarang if you are not using a private car (or choose one of the other routes below which are closer to Yogya and easier to reach). There are frequent buses through Kledung which run between Semarang and Purwokerto.
Garung village is just fifteen minutes on foot from Kledung. Guides can easily be arranged at the Garung basecamp or Kledung Pass hotel. Take the road leading south from the main road through Kledung next to a mosque and BRI bank. The basecamp is on your left (1,420m) and permits can be arranged there if your guide hasn’t already dealt with it. You can also ask for a basic map and route description (in Indonesian).
From Garung, the road leads up through Garung village and the trail through farmland begins at approximately 1,478m. You will almost certainly be able to get an ojek to the end of the road. There are actually two routes – old and new – that you can take (‘jalur lama’ and ‘jalur baru’) and they join together at two possible places further along the hike. The new route (baru) is more slightly more west than the old route but the distance between them is not great. However, this can lead to confusion as there are no signposts and guides have known to become lost themselves on minor farm tracks on the lower slopes! The new trail has presumably been opened to combat erosion on the old route, which is steeper and more slippery. Your guide is likely to take you up the new route (‘jalur baru’) which is a wise decision – even more so for the descent, which is slippery whichever route you take!
Experienced hikers should be able to reach the crater rim in 5-6 hours because although the trail is steep it is only 7 km long. ‘Jalur baru’ (new route) is better for water sources as a stream runs parallel to it on the west. On ‘jalur baru’ (new route) the last place for water is a large stream on the edge of farm plantation at 1,900m. Jalur baru has Pos 1 Malim (1,922m) and Pos 2 Gatakan (2,235m) which are both very basic wooden frames. They will protect you from rain but are of little merit as places to actually camp. There are numerous places to pitch a tent on the way up but most places can only accommodate 2 or 3 tents at most.
At 2,317m is a monument to a hiker who died on Sumbing and a slightly larger camping area. Beyond this, the forest becomes thinner and thinner and views over to Gunung Sindoro become correspondingly magnificent. After the two different routes have met, the first major landmark on the hike is ‘watu kotak’ (stone box) at 2,983m. The trail leads along the left side of this and a second rocky cliff of considerable length (known simply as ‘tebing’) a little higher up at 3,000 – 3,040m. This is near the area known to guides as ‘tanah putih’ (white land).
As you near the crater rim there are two destinations for hikers. Almost all hikers simply continue to the top of the rim. The peak is known as Puncak Buntu (3,308m) and and in good weather conditions hikers are rewarded with the tremendous view over to Merapi and Merbabu. Down below is the large crater – smoke may be billowing from the middle section and there is a large pool of water on the north-eastern end of the crater complex. It is possible to explore the crater by descending into it from the rim or better still by using one of the other routes that lead directly into the crater. However, be very careful of the gases and do not camp there.
The highest point of Sumbing mountain is a steep rocky part of the crater rim further south-west of Puncak Buntu / Puncak Kawah. Most hikers are happy to consider the crater rim as their destination. Although the real summit is not far away, it is slightly difficult to reach and not often visited. Indeed, if this is your plan you must mention to your guide before setting off that you want to climb to Puncak Rajawali or ‘puncak tertinggi’ (the highest peak). Just below Puncak Buntu, there is a trail skirting across the mountain, just 20 metres or so below the top of the rim. It leads up to a rocky part of the rim with an Indonesian flag (October 2010). This is where hikers are most able to descend into the crater itself should they wish.
From here you will be able to see two further rocky peaks on the rim, further west. The second one is the true summit. Getting to the first one (known as Puncak Kawah – the ‘crater peak’) is fairly easy but the terrain is dangerous because there are sheer drops and a little mistake would have terrible consequences. Indeed, by following the very crest of the rim you will encounter drops that are impassable without ropes but can be avoided slightly lower down from the top of the rim. The most difficult section which must be negotiated is an awkward step between the true summit and the rocky peak preceding it. Unless you are a very confident scrambler it is difficult and dangerous to attempt alone. However, if you are with others who can give you a hand you should be able to manage it. Please be careful.
After the tricky section, all you need to do is follow the trail round the side of the true peak and then up onto the top of it (don’t attempt to climb directly up the steep cliffs!). There is a tiled cairn with Javanese Edelweiss at the very top of Puncak Rajawali and the views are – understandably – even better than from Puncak Buntu. To reach the true summit from Puncak Buntu and the main Garung trail takes about 45 minutes each way. It could also be reached from the trail through the middle of the crater from Cepit, Banaran or Kaliangkrik – see below – if hikers climb up to the correct part of the rim.
To descend the same way to Garung from the crater rim takes about four and a half hours., but there are lots of other options if you have a guide who knows some of the other trails and you have already registered your plan to do a traverse.
Located just a couple of kilometres north-east of Garung is another trail starting in Sipetung (1,316m). It leads up via Pos 1 (1,717m), Kyai Santri (2,004m), Pos 2 Petai Cina (2,413m), a stream at 2,460m, Lembah Suci (2,615m) and Pos 3 Watu Ijen (3,060m) before meeting up with the Garung trail.
Sumbing is also climbed from another basecamp further north-east at Cepit, Pagergunung which lies 7km from Parakan. This route leads directly into the crater and it is a longer and generally less steep trail. It is also not as popular as some of the other routes so the middle section may be a little bit overgrown. It is requested that you register and pay a small fee at the basecamp (1,280m).
The village road ends at around 1,761m and you can actually get an ojek for most of the way up there for around Rp20,000 per person (in 2020) which is great value for money and saves well over an hour. Do note that there is only one spot near Pos 1 for water along this route so take plenty with you. The trail (which takes about 6 hours to reach the northern edge of the crater) goes via Pos 1 Aula (1,815m) which has a substantial shelter building like a pendopo (pavilion) and toilets which would be ideal if you wish to shelter from rain. There’s also a small wooden entrance to the forest itself.
The only stream on this trail soon follows (1,895m) just before an un-numbered pos (which might reasonably be called Pos Bayangan, at 1,917m). Next is Pos 2 Shondo (2,100m) which has another large but older shelter, after which the forest recedes and fabulous distant views are possible in good weather.
Pos 3 Lamtoro (2,362m) is next, where there is plenty of flat space for camping and a very small shelter. Then it’s Pos 4 Batu Kasur (stone mattress) (2,713m) which is another good camp spot, Segremeng and Batu Lawang (stone door). The terrain changes just above 2,900m, where you begin to encounter increasing numbers of rocks and boulders.
After these landmarks you reach the entrance to the crescent moon shaped caldera (3,195m) and will surely be able to smell the sulphuric gases. Drop down a little way to the caldera floor and what appears to be a four-seasons large shallow puddle or lake (3,170m). It is quite beautiful here in what is part grassy savanna, part volcanic sand plain (‘lautan pasir’), and part lake. The area is known as Segoro Wedi.
There are two separate sandy areas – the northern one is the one with the shallow lake and seemingly no volcanic activity. A couple of hundred metres further south is the second sandy area, and this time it is clearly active – with noisy fumaroles, small hot water pools and a couple of bubbling mud pools. There are also some caves here, the biggest of which is called Jugil.
There is also a local ancestral tomb (3,209m), known as Ki Ageng Makukuhan which is at the southern end of the southern sandy area. This important spot is protected with a stone wall and many local guides with pray here before continuing the journey. This person is thought to have had a strong influence on the spread of Islam in the local area but the tomb itself is probably just a petilasan, which means a place that has been visited or occupied by someone.
In poor weather such as limited visibility, navigating around the crater area is not easy, so be sure you have a guide who is experienced. After the grave is a signpost but be careful not to follow the arrows without double-checking as the wind can blow the arrows to point the wrong way! The main trail drops down here before dividing. Left is the trail down to Banaran and right is the trail to any of the three Kaliangkrik trailheads (see below) which are ideal for those approaching from the Yogyakarta side.
The Banaran route leads in from the east, starting at an elevation of just 1,128m, and passing via Pos 1 Sekelenteng (1,925m), Pos 2 Siwel-Iwel (2,170m), Pos 3 Punthuk Barah (2,368m), Pos 4 Watu Ondho before reaching the crater rim on the east side.
There are three similar routes in from the south in the Kaliangkrik area, all starting fairly high up and joining together halfway. It’s actually a little confusing as if you don’t specify your route, you might end up at any of the Kaliangkrik basecamps! All three are good options for those approaching from the Yogyakarta area and if you take an ojek then the Adipuro trail is the shortest and quickest of the lot.
Do note, however, that on this southern side of the mountain, the commonly-visited ‘puncak’ is not the highest one despite being named Puncak Sejati, which almost everywhere else specifically means the highest peak. It’s still a great viewpoint, but baggers need to be aware that the true peak is Puncak Rajawali on the western side (best accessed via Garung but also possible from most other directions, if a little more time-consuming as you need to hike through the crater).
The Dusun Butuh trail starts way up at 1,708m in an area becoming known as Nepal van Java, and leads via Pos 1 (2,119m), Pos 2 (2,460m) and Pos 3 (2,625m) which has water sources both before and after it. There is also a stream higher up at 2,825m but best don’t rely on it except during the rainy season.
The Adipuro trail has a basecamp in the village (1,484m) but local ojeks can be taken for a reasonable Rp25,000 (in 2020) all the way up to an elevation of around 2,109m, by far the highest starting point of any trail on Gunung Sumbing, making it the easier and shortest trekking time, especially if you are not bothered about reaching the true highest peak – Puncak Rajawali.
From the end of the farm track, cross over the little bridge (2,110m) and after admiring the stunning river and small waterfall continue up to the lovely Pos 2 (2,200m). The views here to lesser hills and the coastline in the distance are really impressive and it would be a nice spot to camp if you had extra time and good weather. The trail then gets steeper before reaching a junction (2,511m) with the Dusun Butuh trail before Pos 3. There are lots of spots to camp in this area and numerous streams flowing down the steep mountainside. Just after Pos 3, at a popular camping area, is the junction (2,666m) with the Mangli trail (see below).
Above the final water source (2,825m) is a nice section of trail beyond this goes over red-coloured rock (2,866m). Camp 4 AKA Pohon Tunggal / Cepogo is at around 2,985m before the trail finally reaches the crater rim on the east side not far from the Banaran trail. Just to the south is a peak which some locals call Puncak Sejati (3,323m) but it is not Sejati in the sense of being the highest on the range (that is Rajawali at around 3,371m) so we have called it Southeast peak.
Finally, a trail from Mangli (1,475m) is growing in popularity due to its relative proximity to Yogyakarta. It leads via Pos 1 Kongsen (1,755m), Pos 2 Siruwet (2,227m) and Pos 3 Ratan Butuh. The trail joins up with the Dusun Butuh and Adipuro trail at around 2,666m which is a popular spot to camp as there are numerous streams offering fresh water.
Finally, the Bowongso route leads in from the west and is regarded as one of the best for views and as one of the least steep paths. The basecamp is at an elevation of around 1,400m, with a higher parking area up at 1,760m, and the trail leads via Pos 1 Taman Asmara (approx. 2,030m), Camp Plalangan (2,215m), Sumber Air (rainy season water source), Pos 2 Bogel (2,400m), Camp Gajah, Pos 3 Zoro (2,860m) and Tanjakan Seginjel (3,035m).
Bagging information by Daniel Quinn (last updated December 2020).
Trail Map
For a high quality PDF version of this and other trail maps, please download from our Trail Maps page.
Local Accommodation
Featured Guides
If you are a reliable local guide and would like to be featured on this page to increase your bookings, or a tourist who would like to support the development of a local guide business, please email danpquinn@gmail.com with the following information: Mountain name, guide name, guide location, guide contact details, and at least one English language review from a previous hiker who was pleased with the guiding services. An example is given below for reference. We have a maximum quota of 3 featured guides for each mountain page on the site. The fee for this is £20 (British pounds sterling, typically via the Wise app or PayPal) for a period of 1 year and helps to pay towards the ongoing development of the Gunung Bagging project.
- Name and location: Pak Budi, Surabaya, East Java.
- Contact details: +62812xxxxxxxx, budi@gmail.com, https://www.instagram.com/budi_mountain_guide/
- Review from previous client: “Budi was a brilliant guide for our September 2023 trek up Gunung X and I would definitely recommend him to other tourists“, John, USA.
Practicalities
- Getting there: For domestic flights from or to Central Java, such as the airports in Semarang, Solo (Surakarta) and Yogyakarta/Jogjakarta we recommend Baolau. For Garung, buses between Purwokerto and Semarang run through Kledung. From Yogyakarta, take a bus to Magelang and a second bus to Wonosobo. Kledung is just under 3 hours from both Yogyakarta or Semarang by car. The Kaliangkrik trails are the most accessible for those coming from Yogyakarta. Cepit is around 2 hours from Semarang, making it probably the closest to those coming from the north coast.
- Guides and GPS Tracks: Want a PDF version for your phone? Looking for a guide? Need GPS tracks and waypoints? Gunung Sumbing information pack can be downloaded here.
- Trip planning assistance: Would you like Gunung Bagging to personally help you in arranging your whole trip? Please contact us here.
- Permits: Sign the book and pay the small fee per person, available at all basecamps, take a photocopy of your passport photo page just incase. In 2020, Rp15,000 per hiker at the Cepit basecamp – likely to be similar at other trailheads.
- Water sources: According to the Garung basecamp map: Jalur baru – available fairly near the trail up to 2,350m, Jalur lama – available at 1,900m and none higher up. Available at Camp 3 on the Kaliangkrik and trails and just beyond Pos 2 on the Sipetung route. Available just after Pos 1 on the Cepit route and before Pos 2 on the Bowongso route.
- Accommodation: Try the Booking.com map above or use this link to search for suitable hotels, homestays, resorts and apartments for your trip.
- We recommend Safety Wing as travel insurance for overseas travellers and tourists hiking up to elevations not exceeding 4500 metres.
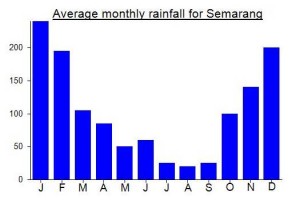
Local Average Monthly Rainfall (mm):
Location
Origins and Meaning
Mount Hare-Lip. The “mouth” of this volcano, or the “lip” of its crater, has a cleft in it like a hare-lip. (George Quinn, 2011)
Has anyone climbed Sumbing via the Batursari basecamp? I want to climb Sumbing during Lebaran and from asking a bunch of the basecamps it seems like that one is the only one open then. Would love any info if people have done it. Especially on how long it might take – the basecamp guys are saying 9 hours up from basecamp to puncak, but most of the other basecamps in the area have overestimated times by 50-65% compared to what Gunungbagging usually quotes (which is usually close to my walking speeds/times).
Can report back that this basecamp (also know as Azora) has been open since 2019 and seems quite large and busy. They seem very relaxed and very local (lots of pictures of my whiteness requested, sometimes holding babies, and when I walked in there seemed at first great fear that nobody could speak English with me, followed by great relief that I can speak Indonesian). They were the only Sumbing Basecamp out of the 14 they told me now operate on the mountain that remained open through Lebaran/Cuti Bersama this year – I’m guessing they’re younger and scrappier than most.
I had a solid guide named Itong, who grew up and still lives very close by and knows the area very well.
The trail is only independent through some lovely forest until Pos 2, at which point it meets the trail from Sipetung, and then merges with the Garung trail very high up. A very good set of trails and very well signposted (so if you’re experienced and in a group you probably wouldn’t need a guide). There are some very steep points, so prepare your legs! (Itong told me Sumbing is famous for being steeper than the other mountains.)
I left basecamp at 10:15pm on an ojek to the edge of the farmed area. Then from 10:30 it took 5.5 hours, including breaks, until 4am to reach the crater rim. Still dark so we slept an hour until 5am and then spent an hour between sunrise pictures and climbing ropes over rocks to get to Puncak Rajawali. So count on 6 to 6.5 hours of walking if you happen to walk at my speed (Itong says I’m fast but I’m overweight and middle aged so I’m not sure what the comparison set is). Then 5 hours down – 7am to noon – including breaks. Maybe I was a bit slow to guard my knees.
Overall a lovely 14 hour excursion that I would happily recommend, though being my first time on Sumbing can’t compare with the other basecamps/guides.
Great to hear it! Nice report – I had no idea there were 14 basecamps! Hopefully Sumbing and Sindoro will not follow in the footsteps of Merbabu in being turned in National Parks, with all the rules, regulations, overcharging of foreigners and diabolical online booking systems that go along with that status! Also great to hear that the true summit is well-frequented compared to previous years.
Interesting to note that unlike many years ago when the true summit (Rajawali) was rarely visited, it is now commonly visited, especially from the Garung side where the latest version of the trail leads much closer to the highest point of the crater rim.
Anyone hiking Sumbing from the Jogja/Magelang side might want to consider a morning stroll up Gunung Tidar, which is walkable from hotels in Magelang, most notably Hotel Wisata. It may only be 503m high but it is a very interesting spot and the forest is rather well-preserved considering its location. Rp3,000 entry ticket and it takes just 15 minutes or so to the top, following cement steps up via several Chinese graves, a warung and mosque, and then Islamic graves in compounds, including that of a Turkish man who helped spread Islam in Java (Kyai Syaikh Subakir), and a prayer spot next to Kyai Sepanjang, not a grave for a human but for what is apparently a 7 metre long weapon such as a sword.
At the top is a grassy open area, and although distant views are limited there are several points of interest plus a beringin tree and another warung. In the middle of the grassy area is Paku Tanah Jawa – the Nail of Java, important in the mythology of the island as it is this object that is said to pin down the island and stop it from moving or sinking!
The tall monument behind seems to be the highest point of the hill and is a flagpole. To the right is a more modern monument. And finally behind the flagpole is perhaps the most impressive of the Islamic grave enclosures – Kyai Semar.
Tks for the info Dan. I will be hiking sumbing via the dusun butuh, kaliangkrik route. If weather permissible, and worth noting (and if I can make it up to Rajawali..lol), will share my some notes here for those wishing to take on this route.
Cheers.
The weather has been very wild the last week or so in Java. Pretty similar to below average Scottish weather when you’re on the hills. I did a traverse of Sumbing, as I had long wanted to visit the crater. On the train to Semarang, near Karawang it was possible to clearly see the Jatiluhur hills of Gn Parang and Bongkok, always the best visibility in the rainy season after a downpour.
The Palpag (Pecinta Alam Pagergunung) basecamp in Cepit is currently being renovated, and the trail remains quiet. There were no others on the night we climbed. A fair bit of bureaucracy for a foreigner – they wanted to see my rapidtest result and ID and so on. Would this have been the case for an Indonesian? Not sure.
My guide was from the Adipuro trailhead – on the Yogya side down in Kaliangkrik where there are now 3 trails going up/down the southern side of the mountain. We got ojeks up to the end of the road. Light rain, and a civet cat (luwak) leapt across the track at one point.
There were a few rain showers but I remained optimistic that by 5am the conditions would improve and we would get some views. Sadly, as we got higher, especially beyond Pos 4 Watu Kasur (or the camp area which is called Puntuk Sejengking if you take the ‘jalur baru’ to the left just before Pos 4) the wind got more and more severe, unusually so for Java and we were happy to get a little bit of shelter from the winds once down in the crescent-moon crater.
It was not easy navigating at this point, but my guide did a great job and we were resting by the fumaroles and warming our hands in the warm water before long. A brilliant spot, but I barely took any photos at all for obvious reasons. Sunrise time came, but the sun itself did not shine at all.
We continued on to the grave or petilasan, and up onto the Kaliangrik trail. I was quite keen to visit so-called Puncak Sejati (Southeast Peak) but given the gusty conditions and the impossibility of a view we didn’t bother risking getting blown off and continued down instead. Gusty but with views ok, or calm but no views and we would have done it but there really isn’t much point when the wind is howling and you can’t see a thing. Especially as I visited the higher Rajawali peak ten years ago.
Being local election day, there were actually quite a number of hikers on their way up, hoping for the weather to improve. I think most of them came up from the Mangli trailhead. The clouds were all the way down to below 2500m, anything above that was blanketed in cloud and probably had been all night and would remain so for the next night too.
We were down at Adipuro Pos 2 in well under 3 hours – a very nice woodland spot with great views to minor hill ranges and the coastline. My guide called his village friends to pick us up down near a little bridge over the river. Great views to Merapi and Merbabu. As I was getting the train back from Jogja, I decided to call off at Candi Seloroyo, a very impressive solitary Hindu temple similar to the Dieng ones, in the cluster of hills between Gunung Sumbing and Magelang. It’s quite a way into the hills from the nearest village, and the gate was locked, but you can reach the gate by motorbike and peer inside. Then I got the bus from Magelang to Jogja (Rp20,000).
Jogja itself was rather depressing, at least down Jl Prawirotaman. Most of the businesses have closed, perhaps permanently, due to the lack of tourists.
Hi Dan,
first of all thanks for running this website and your in-depth comments about each aspect of the hikes!
I am based in Yogyakarta and planning to climb Sumbing soon via the Adipuro trailhead. My question is regarding the guide for this hike: How much does a local guide usually charge for this hike? Is it a fixed fee or based on how many people I bring in my group? Can we just go to the basecamp and arrange a guide on the spot or do we need to arrange this in advance?
Thank you,
Jack
Many thanks Jack. You can arrange it last-minute although weekends the guides might already be busy with other hikers. Rainy season means it could be closed at short notice but it remains open at present. The price depends on your negotiation skills (unless they have a fixed rate) and whether you are camping or not (i.e. how long you will be up there). With a big group they will often bring a friend along as a second guide. Smaller groups are recommended at present for obvious reasons! Cheers!
That mountain is great at the top hey. Could spend hours up there exploring! Shame to hear about the weather and more of a shame to hear about Yogja. Hopefully we can all travel back to Indonesia soon 🙂
I climbed Sumbing this morning from Garug Basecamp.
I left the Dieng Kledung Pass Hotel at 1am and arrived at the basecamp to park my motorbike. This was kind of a mistake because then I had to go through the hassle of registering and wasting time. If I had my time over I would have ridden straight to Pos 1 or just parked in the village.
Anyways I registered at the basecamp and had to leave my motorcycle registration as collateral as I left my passport in the hotel. I filled out the paperwork and was on the trail at 1.20am. Registration fee was 20k.
The second mistake was not taking an ojek to Pos 1. I walked the 3k and 500m up. That added significant extra energy that I didn’t really need to use. From basecamp to Pos 1 it took me 50 minutes. Then I reached the summit of Puncak Buntu at 520am, 4 hours after setting off. The trail is quite hard and I had a significant climb of over 1800m vertical.
I saw to the right the real summit and thought I cant come here and say I’ve been to the summit when there is this really obvious and higher peak to the right. I found a very well worn trail that is just below the rim and this took me all the way to the true peak Puncak Rajawali. From Puncak Buntu to Rajawali it took me 20 mins and I gained the summit just before the sun came up.
I descended into the crater afterwards to check out the sulphur plumes and then climbed up another path that leads to the half way point between Buntu and Rajawali. You could spend hours in here exploring all the different areas it’s really amazing.
I left the summit at 630 and was at Pos 1 by 8am. I hired a young boy to take me down on his bike to basecamp for 25k. Which is well worth it because the walk down would have been over those terrible cobbles.
No guide necessary and no one mentions anything about it. Just register and go on. If you can get the bike to Pos 1 it will save a lot of effort. The path is also very obvious, no chance to get lost at all, even in the dark.
Climbed Sumbing this morning, and here are some updates for the climb (the description is outdated, and contains a little error)
There is now a cobbled road all the way to Pos 1 at 1930 m. It is VERY well signposted from Garung. However, do not attempt to ride a simple ojek all the way up – it is too steep (35%) and you might topple backwards. I left the ojek I had rented from the Kledung Pass Hotel receptionist at 1780 m – you can park it nicely where a wide track veers off to the right. Alternatively, get a local on a cross motor to drive you all the way up to Pos 1.
The track itself is well-signposted too, so no possibilities to get lost. It is extremely eroded between 2300 and 2500 m, but with a bit of care this is OK – not in rain though, do not even think of this top in rain.
The lip (Puncak Buntu) is reached much higher than 3008 m – this must be a typo or another trail. I reached it at around 3200 m.
Climbed up from Pos 1 to the Puncak Buntu in 1 hour 40 minutes, underscoring that this is not the most extreme climb in Indonesia. I am a competitive mountain runner though – left the hotel at 4:45, parked my ojek 10 min below Pos 1 at 5:00, was at the crater rim 6:50, and after 15 min there I ran down again and took my car at 8:30 from the hotel to make my Semarang flight. Fast but still hugely enjoyable!
Many thanks for your report. 3208 is probably the correct height for the rim. Updated.
It’s more or less impossible to keep writeups for 300 hikes across the archipelago up to date without it being a full time occupation! As always you are more than welcome to make a donation towards our efforts. Best regards from Jakarta.
Or even 3308!
Your website is indeed fantastic, helps so much with information one otherwise would not have found (always had to contend with the half-baked info in Lonely Planet). Will look at donation possibilities as I understand this is a lot of work!!!
also agree to the 3308 – my GPS has the tendency to show somewhat low after a long ascent.
Sumbing on Boxing Day was the busiest mountain I have seen in Indonesia. Hundreds of tents were strewn across every forest clearing and flat patch of earth on the upper slopes, and sometimes across the trail itself! Despite this, there seemed to be very little litter left behind the next day, a sign of the discipline of the thousand or more hikers.
For our hike up Sindoro last year, the Kledung Pass Hotel put us in touch with an excellent guide. But their guide for Sumbing proved less satisfactory. It’s probably better to arrange a guide at Garung base camp (a house where you can also sleep), which was a hive of activity when we visited and is only a 3 minute drive from the hotel.
I paid Rp20,000 hiking fee at the base camp and Rp25,000 for an ojek up the cobbled track to Pos 1 (1930m), where there are a couple of warungs selling hot snacks and drinks. Setting out at 22.30, we reached the crater in 6 hours 30 minutes, including some long rest stops to wait for the dawn. I then hiked alone to the mountain’s highest point and back to Puncak Buntu, taking 45 minutes each way. (My guide declined the chance to accompany me.) Our descent to Pos 1 took 4 hours.
According to the guys at Basecamp, the highest summit of the mountain is called Puncak Rajawali (or Puncak Sejati), which is confirmed by a sign there and an Indonesian flag, currently the only one fixed anywhere around the crater. The second highest peak (3332m), which you must pass on the way to Puncak Rajawali, is called Puncak Kawah. Puncak Buntu, the peak that most people congregate on, is still called Puncak Buntu!
If your main destination is Puncak Rajawali, there’s no need to go first to Puncak Buntu, as you may then be tempted to hike around the crater rim, creating needless difficulties. Instead, stop at the 3–way junction at 3264m, where there is a somewhat uninformative metal “puncak” sign. The straight ahead path heads directly up to Puncak Buntu, while the well-defined path to the right mostly remains 20 to 30 meters below the rim, as advised by Dan, and leads to Puncak Rajawali, with only 2 tricky sections.
First, when you clamber up the rocks that guard Puncak Kawah, the second highest peak, you need to stop after the first (easier!) half and veer right, as mentioned in Frank Creedon’s post, onto a narrow, but clear footpath. Don’t fixate on climbing to the top of the rocks!
Second, there is a near-vertical drop of perhaps 4 meters down to the col between Kawah and Rajawali peaks. On my visit, there was a long cloth strap suspended from a tree trunk to help with the descent. Coming back up it might be easier to scramble directly up the rocks; using the rope needs more arm strength. In any case, the drop is well back from the crater rim, so there is no danger of tumbling over the edge!
The col between Kawah and Rajawali peaks also has the easiest looking trail down into the crater. In 15 minutes you could probably reach the active area in the middle of the crater floor, though nobody was down there on the day I was there.
Although this was the rainy season and mountain-forecast.com predicted rain, we only suffered a heavy downpour in Kledung before starting out. For the hike itself, the weather was superb, with minimal cloud cover, a full moon and superb visibility throughout the morning. To the east we could see Merapi, Merbabu (with Lawu partly obscured behind it) and Telomoyo, and to the northeast Ungaran. To the north is Sindoro, with Prahu behind its east shoulder and the other Dieng mountains behind its west shoulder. Slamet, and even Ciremai, were visible in the far west.
Hi John, I’m thinking of going to climb Sumbing in September and been trying to find a contact to get a guide online with not much luck. Is it possible to get a guide after reaching Kledung at short notice?
Thinking of taking a bus from Semarang airport and just trying to find someone locally.
I twice arranged guides directly on arriving at Kledung Pass Hotel. The Sindoro guide was good, the Sumbing guide less good. It’s probably better to go to the ‘base camp’ in Garung village, a small house just a kilometer or so from the hotel and a few hundred meters off the main road. It seemed very well-organized when I was there. There was a committee of ticket-sellers, ojek rides up to the trailhead and lots of information. I’m sure that in September, which is still the dry season, you will be able to arrange guides there.
Anyone have a rough estimate of transport cost from Semarang? Thinking of grabbing a taxi / private hire at the airport. Thanks!
hi tim . i did take a taxi from the semerang airport to kledung. i cant remember how much i payed but it wasnt much.i think roughly between 200,000 to 300,000 rupiah. maybe even less. one tip when arriving at the airport, dont go to the private car company inside the terminal.they have limosines that were millions.go outside to the taxi stand and ask to kledung pass. they have a book with the prices written down to all the places so you pay upfront and dont get ripped off.
A private car costs around 800.000 to Dieng plateau, which is quite further away from Kledung
It is possible to go by ojek most of the way to Pos 1 on new route but the road is extremely steep. Arrange ojek @ basecamp to ensure the driver knows the way. Got to 1 KM before Pos 1 then the back tyre on the ojek blew. The road is cobbled & as you get near Pos 1 the gradient is about 1:3. Once you are near Pos 1 the route up is fairly obvious. No water anywhere on the route. Went solo to the true summit but would not recommend this unless you are very confident with route finding & exposed scrambling. Safer to go with a guide. When you are scrambling up the second summit go about half way up then on your right there is a tiny trail, follow this round to your right & it will give you an easier route up Summit 2. From summit 2 go down & a little right there is a little broken tree, this is the route down to the narrow windgap between summits 2 & 3. The downclimb is the crux of the route. There are a few tree roots & branches for handholds but only dusty footholds. Be extremely careful on this section. Then you are facing summit 3 which is a cliff but a small trail goes slightly to the right of it avoiding all difficulties to reach the true summit. Be sure to descend the same way you came up. Going back up to summit 2 is a lot easier than the downclimb. Took 7 hours round trip to the true summit & back to Garung village. Allow longer & start early, if you are in good condition you can do it as a daytrip from Kledung Pass Hotel. The hotel is nice & staff are friendly. 310,000 R for single room with breakfast, they even gave me lunch instead of breakfast which I missed due to early start. When I was there (July 2015) access to Sindoro was closed as it was getting very active.
To Dan. Kumpul is an excellent guide living in Garung (northern approach). He knows the other approaches including the less hiked Kaliangkrik route. His number is 0853 255 779 77.
Hi all,Im now 70. In 1967 as amateur trekker for this 1st climbing I managed to reach the Sumbing rim and down further the crater to stay overnight with no prior knowledge or information of any danger from the gases. Entirely primitive. Falling asleep was impossible as temperature froze much below zero indicated by green leaves covered by snow at sunrise, an unforgettable experience.
Starting the climb by walking from Magelang, Bandongan, staying overnight at Kaliangkrik, taking 7 hrs from there up the rim. View was unbelievably magnificent.
I will be happy to revisit sometime soon.
Anyone has the HP number of the Bowongso basecamp leader, please? I heard the Bowongso route/ trek leads hikers to the true peak (3371). Is it true?
Bagged Gunung Sumbing on 27th Aug 2013. Went up from Garung village and came down to Cepit. I would suggest to bring all the water you need for the climb. It is a dry mountain. The guide told me that the names of various areas at the top of the mountain are Puncak Buntu and then next to it is Puncak Kawah and then further & higher are Puncak tertinggi and Puncak Abadi. I camped at Puncak Kawah and went up to Puncak Tertinggi. The guide said that Puncak Abadi is the highest peak but to get from Puncak Tertinggi to Puncak Abadi (both peaks are next to each other), the guide said that it would requires one and a half day of hiking and additional porters (4 porters were mentioned) to carry the required the water supplies I guess this Puncak Abadi is the 2nd peak of the “…two further rocky peaks on the rim, further west. The second one is the true summit.” mentioned in Dan’s bagging information about Gunung Sumbing? Anyone is able to clarify this?
The Kledung Pass Hotal’s full name is Dieng Kledung Pass Hotel & Restaurant and is located by the Kledung Pass’s main road directly in-between Gunung Sumbing and Gunung Sidoro. The hotel area is rather large with garden and the rooms are clean and price is reasonable. It is a good hotel to sleep in with both Gunung Sumbing and Sidoro keeping you in their views!
The climb was just 2 hours 20 minutes. One of my favorite mountains here.
I’ve been climbed this mount 3 times but only reach puncak buntu. My last effor to reach the real summit is stoped at the ridge (i haven’t confident enough hehe) Next month i will try to reach the highest point.
Hatihati Ricky, you definitely need another 1 or 2 people with you to help. It would be very difficult if you tried to do it alone. Some of the guides at Garung know the way but they don’t go there often.
thanx Dan, im not going alone there. I’ll go with some friend (hope they have enough courage hahaha).
The hike from Cepit has an advantage. You will have to walk through the Segarawedi (Sandsea) caldera before the summit. Segarawedi is surrounded by 200m cliffs and the air is mythical. In the dawn, the cliffs are blue and in the early morning they are gold colored. Just unforgettable. You would miss a unique beautiful place if you hike from Garung and do not descend to the caldera. If you plan to hike G Sumbing, I recommend an ascent from Cepit and descent to Garung.
I recommend Ragil (081328096081) as he is a superb guide.
hello, i’m Indonesian..I live in Magelang,not far from Sumbing Mountain. Sumbing is nice mountain, you can climb it from Kaliangkrik Basecamp(Magelang).From this road you will be able to see nice scenery and many of waterfall. so, if you want to go there, you can contact me. I will accompany you to get the nice experience.not as guides or porter, but the partner..
Successfully reached the rarely-visited true summit yesterday morning. It’s a bit difficult but with help from others to – quite literally – give you a hand on the awkward drop between the highest and second-highest peaks on the rim most confident hikers should be able to reach the true top. The views are much better. Merapi was smoking more than usual but we didn’t see any major activity.
The guides (from Garung basecamp) were very good, but we did have the usual problems – having to wait around for them to get ready even though we had arranged to start at a particular time, asking for more money for the second guide (even though we had specifically asked for just one and the second guy had come along presumably to try to get us to pay them more!). But they knew the routes well and helped us get to the true summit – something you definitely have to specify in advance! Not bad for a late October hike – good luck to Liz and Zubs who are continuing on to Sindoro, Merbabu and maybe even Lawu too later this week…
Thanks for letting us tag along Dan! It was a GREAT experience, a lovely mountain and a sweaty climb! 🙂
Merbabu and Lawu were a breeze after the race to the true summit of Gn Sumbing!
Been there, but didn’t have a chance to get to the summit due to weather condition. I was there on December 2007. It was rain a lot! the fog was quite thick, and it was windy and very cold :D, but you know what, that was i call experience!!! So, don’t miss climbing this one!
It’s nice mountain.. i’ve been there twice… ^^