
Facts
- Elevation: 1,772 m (5,814 ft)
- Prominence: 1,374 m
- Ribu category:
 Kurang Tinggi
 - Province:
 Sulawesi Utara (North Sulawesi)
 - Coordinates: 0.7571, 124.4160
- Rating:

 (6 votes) Add your rating
 Loading...
 - Eruptions: 1845
- World Ribus ID: 69098
Photos


Bagging It!
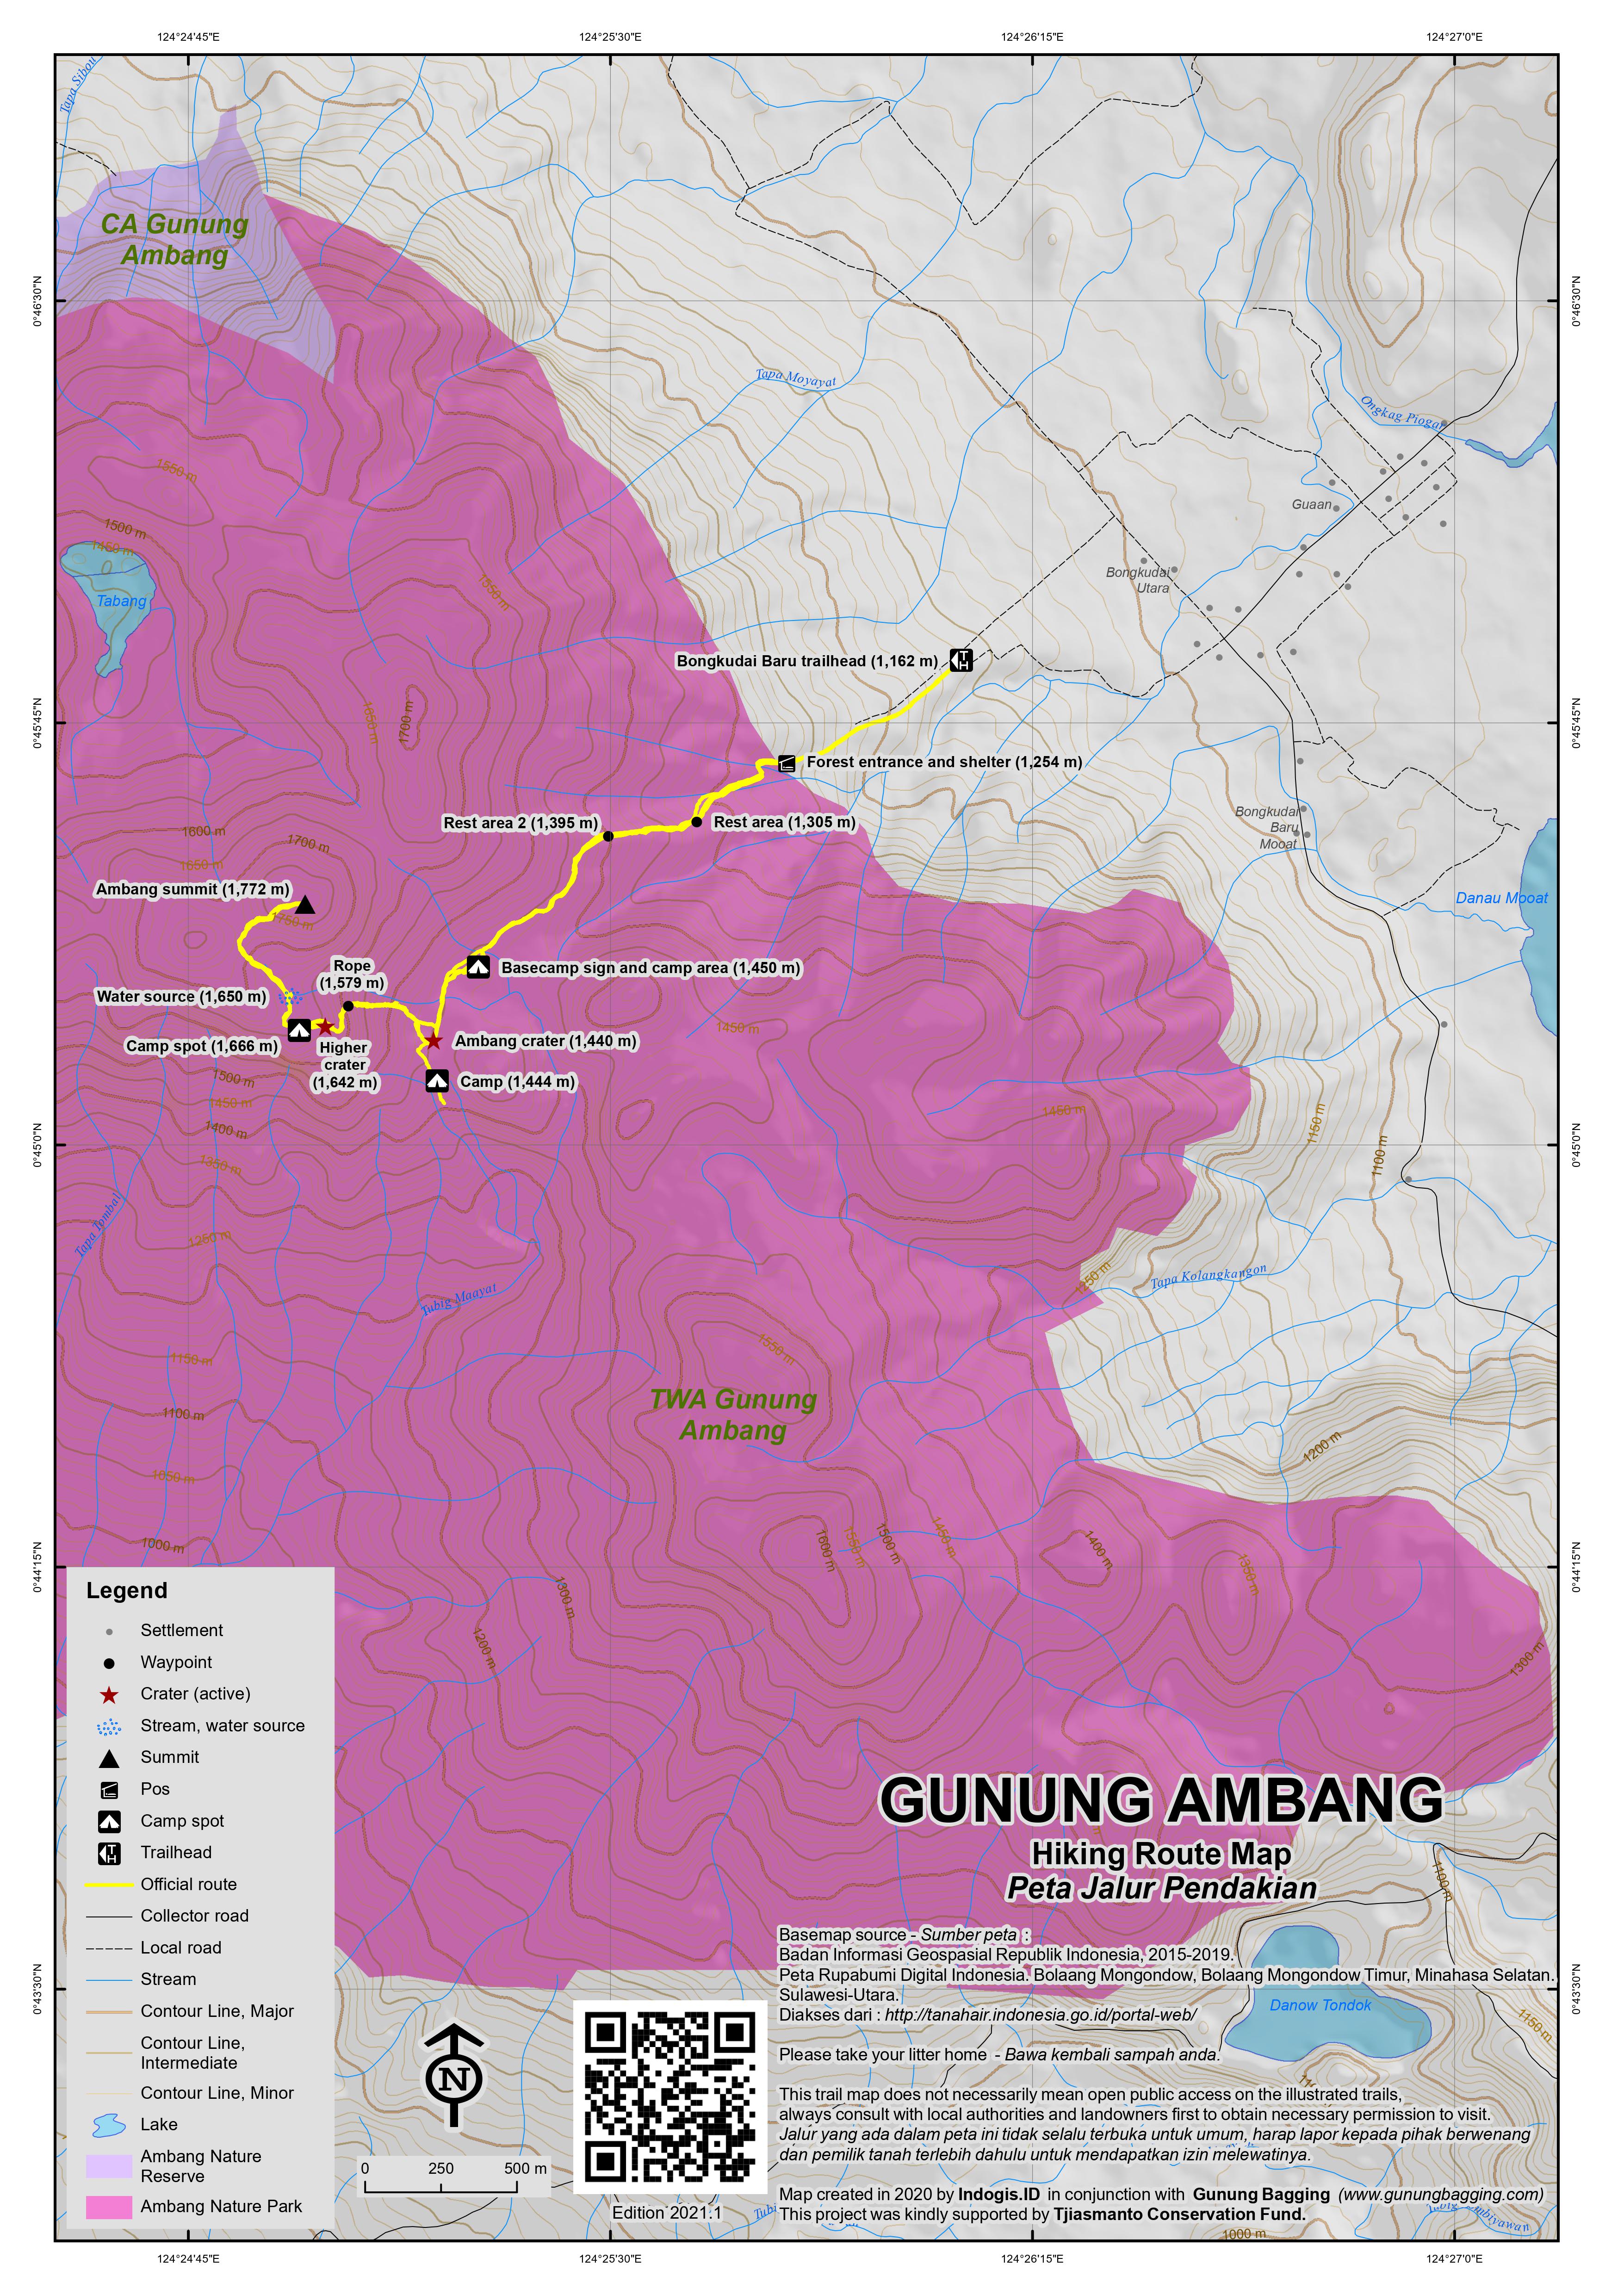
Gunung Ambang is an excellent volcanic crater complex and one of the easiest hikes in Sulawesi, requiring just over 2 hours to reach the summit via the crater from the trailhead. It is well-known for its bird life – you stand a very good chance of spotting eagles if you stay in the area for a couple of hours. The best starting point for Gunung Ambang is Desa Bongkudai Baru/Utara which is about 40 minutes by car from the small city of Kotamobagu. The crater can actually be seen from the main road to the west but the trail starts to the east of the mountain.
Bongkudai Baru/Utara is at about 1,085 metres above sea level and on the shores of the picturesque Danau (lake) Mooat. The views over the lake at first light are exceedingly pleasant. Originally, the trail led up a wide farm track between fields in which farm workers will probably be working even at 6am but in 2021 this has already been paved so you can leave your motorbike up at 1,162m where the road ends. Before long the trail narrows and enters forest just after a large wooden shelter on the left and an entrance sign (1,254m). Not so long after this point there are several important and unsignposted turnings you need to make so a local guide is a very good idea.
There are two rest areas (at 1,305m and 1,395m) where you can sit. The track is a little muddy in places but after less than an hour from the start you will have entered an area of elephant grass and be greeted with a large sign with ‘Basecamp’ written on it. Despite the sign also urging campers to camp elsewhere due to the dangers of falling branches, this seems to be quite a popular spot in which to camp. Before long you will see the crater cliff walls on the right and smell the faint whiff of sulphur in the air.
After a junction (left for a camping area and a stream of natural hot water which is reportedly safe to drink) you find yourself on white rocks at the start of the crater itself (1,447m). The view back down to Danau Mooat and a jungle-clad peak behind it is wonderful but the better views are actually to be found further over on a little rocky top on the far side of the crater area. A few fumaroles seem to be permanently active. Up to the right are steep crater cliff walls.
It looks steep, but there is a well-worn trail up the cliff walls, and with care this can be done safely. There is a small rope at the steepest section (1,579m). The views get better and better as you get higher, and there are even some pitcher plants in this area. It is certainly an excellent panorama of the entire crater area. Back down near where the camping spot is you should be able to make out a weird mini-crater with a muddy cone but apparently this currently cannot be accessed without the use of a machete.
At the top of the cliffs is a flat area and small camp spot (1,666m). Down below is yet another crater area with active fumaroles. To reach the summit, you now need to leave the impressive views behind and head into the undergrowth which eventually leads into proper forest and drops down slightly to where there is a small water source (1,650m) which can be either just a couple of pools or a small stream after rainfall. There are a couple of trail junctions here which appear vague. In general, turning right seems to be the best idea to reach the summit. From the water source, the trail leads up more steeply to the summit clearing which is crowned with a double summit pillar. The base is a shapeless lump of cement of unclear antiquity. The new ‘crown’ on top of it is a smaller, more graceful summit marker erected in 2021 by local hiking clubs.
There are no views here at the top but it’s a nice place to have a snack before descending by the same route. It is best to leave yourself at least two hours to enjoy exploring the scenery and taking photographs of the fantastic landscape. A descent back to the trailhead takes little over one hour where hopefully you will have transport waiting to take you back into Kotamobagu.
Gunung Ambang is well-known in the local area, but due to its relatively obscure location is not as famous nationally as it ought to be. A recommended hike, even for beginners.
Bagging information by Daniel Quinn (last updated October 2021).
Trail Map
For a high quality PDF version of this and other trail maps, please download from our Trail Maps page.
Practicalities
- Getting there: Kotamobagu is 4 hours by car from Manado and 6 hours from Gorontalo. There is a DAMRI bus running once a day from Manado to Kotamobagu. Alternatively hire a car and driver or simply one seat in a shared ‘travel’. From Kotamobagu there are blue angkots running to and from Modoinding although not always at convenient times. Ojeks are not common and bentors will rarely take you to the trailhead, so best plan ahead with your guide.
- Guides and GPS Tracks: Want a PDF version for your phone? Looking for a guide? Need GPS tracks and waypoints? Gunung Ambang information pack can be downloaded here.
- Trip planning assistance: Would you like Gunung Bagging to personally help you in arranging your whole trip? Please contact us here.
- Permits: Not required but you can register in the village before starting your hike.
- Water sources: Natural hot water available at the camping area near the crater. Limited amounts up at 1,650m before the summit.
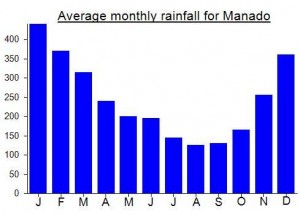
Local Average Monthly Rainfall (mm):
Location
Click on the blue arrow ![]() (top right) to see your current location on the map
(top right) to see your current location on the map
In addition to the expensive PCR test I did in Ternate (turned out to be unnecessary as Antigen is ok for this route but nobody is aware of this fact yet!) all passengers arriving in Manado currently have to do an Antigen upon arrival. It’s fast and free, but yet another hassle. As I had booked another PCR for my return to Jakarta, it meant I did 3 tests in the space of two days. Ludicrous, but some folk are making good money from all this. The Lion testing place in Manado city is cheap but hopelessly complex, with long queues of confused people, QR codes, apps, scanning various things, meaning almost everyone needed to ask for help. It took over 90 minutes for the whole process, whereas it had been just ten minutes in Ternate! As usual, the folk who implement these systems never consider the most important aspect…. How easy will this be for someone who has never done it before? They never seem to consider that crucial perspective. Anyway, I got it done in the end! And the views to Manado Tua are quite pleasant.
There’s a DAMRI to Kotamobagu once a day but may or may not fit in with your schedule. Try asking for the latest timetable via +62 812-4435-6669. I couldn’t find any info on Nyiur Trans red shuttle buses that used to run to Kotamobagu. Instead of waiting around for a car to fill up with passengers, I found a very pleasant driver called Fadli who drives Manado to Kotamobagu and back. +62 823-6545-6713. Recommended for the roughly 4 hour journey.
The next morning, my guide arrived and we set off for Gn Ambang. BMKG had forecast extreme thunderstorms for lunchtime so I wanted to get this done early. There is asphalt surface all the way up to the end of what used to be a rocky track, so Ambang is even easier than it used to be, and more popular, especially on weekends.
We were up at the summit in just 2 hours or so. My 89th Ribu in Indonesia/Malaysia/East Timor. 3rd time lucky on Ambang. One of my favourites… brilliant views, friendly locals, easy trek… and baggable! If you know the route.
GPS fluctuated between 1772 and 1778 so 1772 on the Bakosurtanal map seems reasonable. A bit lower than expected but still very much a Ribu.
Back in Manado I stayed at the Lion Air Hotel (!) as there is a promo price on at present, presumably due to the pandemic.
It appears that earlier this month some local hiking clubs built a cement summit pillar at the top. According to Google Earth in the right location! So access is probably easier. May have to head back at some point…..
Hiked Ambang for a second time last week, and made it up to the top of the steep crater cliffs with the help of a couple of local village boys. Sadly there was rain and very low cloud meaning trying to find a way through the dense vegetation to the highest point was near impossible. I looked around at other potential routes up from path junctions on the lower sections of the trail but none seemed especially likely. Needs good weather and a full day of exploring I think – but probably possible with a bit of effort, good luck and sufficient time.
Thanks to Nyiur Trans it is a lot easier now to plan a trip to/from Manado rather than having to haggle with chancers on the side of the road trying to fill up cars. However, do note that they rarely reply to text messages (you need to call persistently) and more importantly the information on their website is not trustworthy – I walked across Kotamobagu to the address listed on the website to find no such office existed. When I finally got a reply from the office in Manado on this issue it turned out the new location in Kotamobagu is on the opposite side of town biut they hadn’t bothered to update their website with correct information! When I raised the point that this might affect the success of the business, the friendly chap in Kotamobagu agreed, but in a way that suggested this was a profound new realisation rather than basic common sense!
It is possible to reach the summit from the north-east, according to VolcanoLive. John Search reached the dense forest at the peak in June 2013. For a photo see http://www.volcanolive.com/ambang.html
Did you climb from the west? Good quality satellite images and looks like you could get fairly close to the summit from the east, climbing up the grassy slopes from the farmland above the Danau Mooat?
From Danau Mooat. There may be another trail up though. So many gunungs to bag, so little time. Tried 6, only managed to bag 2. Good trips though.