
Facts
- Elevation: 3,332 m (10,932 ft)
- Prominence: 3,069 m
- Ribu category:
 Sangat Tinggi
 - Province:
 Jawa Timur (East Java)
 - Coordinates: -8.1256, 114.0467
- Rating:

 (37 votes) Add your rating
 Loading...
 - Other names: ꦒꦸꦤꦸꦁꦫꦲꦸꦁ
- Eruptions: 1586, 1593, 1597, 1638, 1730, 1804, 1812-15, 1817, 1838, 1849, 1859-60, 1864, 1881, 1885, 1890, 1896-97, 1902-03, 1913, 1915-17, 1921, 1924, 1927-29, 1933, 1936-41, 1943-45, 1953, 1955-56, 1971, 1973-78, 1982, 1985, 1987-91, 1993-95, 1997, 1999, 2000, 2002, 2004-05, 2007-08, 2012-13, 2015, 2021, 2025
- World Ribus ID: 69008
Photos


Bagging It!
At over 2 kilometres in diameter, Gunung Raung has the largest crater in Java. It’s one of the most remote and least climbed of the 3000-metre plus peaks which means that there isn’t much litter on the trails and it really is a mountain to escape from civilization for a while. Lots of people do see the immense and impressive crater from the air as it is on the flight route from Java to Bali. Raung last erupted in 2015 but there hasn’t been a catastrophic eruption for many decades. It is worth looking at the excellent old photos of the 1913 eruption which are available online.
There are two main routes up Gunung Raung. The most popular route to the rim itself is from the north at Sumberwringin, where accommodation, guides and porters can be arranged. This trek can be completed in two days. However, those wishing to reach the true highest point of Raung crater rim (‘Puncak Sejati’) must hike in from the south near Kalibaru and be prepared to spend two nights on the mountain and complete some short sections of roped rock climbing. NOTE: The two routes do not link up so there is no way to hike up one and go down the other.
Route to true summit (‘Puncak Sejati’) from Kalibaru area
The true highest point of the crater rim, Puncak Sejati, used to require a week but in recent years as more and more groups have used the trail from Kalibaru it can now be achieved in 3 long days. You need an expert local guide and it is best to arrange this as long in advance as possible to ensure that he is not already booked by another group. There is one basecamp in Wonorejo and one in Kalibaru (Adios Pala run by Kang Jarwo – republik.raung3344@gmail.com / 0878 5727 2111). The Kalibaru basecamp and guide is recommended as it is less than 1km from Kalibaru railway station and shops where you can get all your supplies ready the night before. Your guide will provide you with helmets, ropes and all the necessary but basic equipment required to negotiate the difficult sections of cliff on Day 2.
Day 1: Depart Kalibaru on motorbikes for Wonorejo (570 metres above sea level, 20 minutes away) where you register. Then continue for a further 30 minutes on motorbikes up challenging and muddy terrain to Pos 1 (note that you may need to change ojeks in Wonorejo) which is at an elevation of 896m. Pos 1 is where most hikers start hiking – if you hike in all the way from Wonorejo you will probably need more than 3 days in total to complete the hike. It is a simple warung/hut in coffee plantations run by Madurese Pak Sunarya and his wife. Just one minute down to the left is a good place to view Raung itself in good early morning weather. From here it is 10km in a straight line to the peak.
The gradient of the trail is very pleasant at first and you should hear the flapping of hornbill wings and the grunting of wild boar in the forest around you. You may also spot the beautiful little indigo flycatchers. You should have reached Camp 2 (1,451m) in less than two hours. It is then 30 minutes to Camp 3 (1,638m) and another 45 minutes from there to Camp 4 (1,815m). Camp 5 (2,045m) follows after another 45 minutes and a similar time again to Camp 6 (2,222m) which is near seismological equipment. Finally you will reach Camp 7 (2,553m) which is a pleasant ridge and the best place to camp for both nights on the mountain. It should have taken you 6 or 7 hours including breaks to reach Camp 7. There are great views to Argopuro and Semeru and enough space for at least 10 tents.
Day 2: Leave Camp 7 with headtorches before 4am to make the most of daylight hours for the summit attempt. After just over one hour you will have reached Camp 8 (2,870m). It is then another 45min to an hour to reach Camp 9 (3,068m) which is the last ‘Camp’. The trail is still in forest here, but there are plenty of gaps in the trees to look west to Argopuro and east to Bali’s Gunung Agung. You will also see a majestic peak on Raung’s crater rim to the right of the trail – this is Glenmore Peak (3,227m) which is 1km east of Puncak Sejati. Note: There is actually a trail up from Glenmore to Puncak Sejati via the Glenmore Peak and the trail has water sources on it. However it can take one full day of crawling from Glenmore Peak to Puncak Sejati due to the vertical drop down to the crater and slippery scree! No wonder the Kalibaru route is the preferred one!
Finally, after about 2 hours from Camp 7 you will have reached the end of vegetation (3,115m). Another five minutes and you will be at Puncak Bendera (‘flag peak’, 3,139m) which has an Indonesian flag and offers an astonishing panorama of distant mountains and villages. It is also where you first get a proper glimpse of the difficult sections of trail up to Puncak Sejati. You may wonder if you can really do it or not! This is where you put your helmet on.
From Puncak Bendera it is about 3 hours to reach Puncak Sejati and it is one of the most challenging trails in Indonesia. There are very narrow ridges to cross with sheer drops on either side and slippery scree covering them and short near-vertical sections requiring ropes, helmets, calmness and confidence! After traversing the first of the narrow ridges, you will definitely need to use ropes to ascend a short section of rock with considerable exposure. It is only 10 metres or so but may actually be the most difficult section of the lot and for most hikers is unthinkable without ropes.
The next major landmark is Puncak 17 (3,172m), a stunning pyramid-like peak with a summit marker by Pataga Surabaya on it (with the wrong elevation figure). There are two routes here – guides tend to take you over the top (ropes normally required) on the way to Puncak Sejati but traverse round the side when returning (ropes not strictly required but will be of benefit). On the other side you will need ropes to descend about 20 metres or so – not technically difficult and not too steep.
After Puncak 17, you have another narrow ridge to cross with sheer drops on either side. Some people prefer to shuffle along rather than walk across due to all the little stones making it an easy place to slip. There are then two very short sections where a rope is useful – only 3 metres or so. Now you are down on a huge expanse of steep rock with gullies. If you look up you will see a collection of vertical slabs of rock jutting out into the sky. This is the next target and is called Puncak Tusuk Gigi (‘toothpick peak’, 3,315m). This is not technically demanding, but like on Merapi and Semeru you have to be careful when in a group that you do not send rocks flying down behind you to others on the trail.
Just before you reach Tusuk Gigi, you have to crawl through a large hole over rocks with considerable gaps in between them – care needed. Once through this hole you are rewarded with amazing views of the vertical slabs of rock up-close and also the edge of the crater. But it’s only another 5 minutes up to the right to Puncak Sejati itself where the panorama is most amazing. Guides suggest that Puncak Sejati is 3,344m but the officially-published height is 3,332m and our GPS devices didn’t get a reading over 3,338m. The highest point is marked with another Pataga Surabaya marker from 2013, but there are other mini-summits just metres away of a very similar elevation (GPS device gave the same reading on all of them suggesting just centimetres of difference in height).
There is a section of crumbly cliff just beyond Puncak Sejati which people like to pose on for photos of themselves with Java’s largest crater behind. Do take extra care if you decide to do this. Further east you will see Glenmore Peak and in the distance Ijen-Merapi and Baluran. To the north is the jagged outline of the little Gunung Ringgit and to the west are Argopuro and Semeru. Looking back down at Puncak 17 and Puncak Bendera and you will barely believe that you have made it up here! Congratulations!
It takes about 2 hours and 30 minutes to get back to the relative safety of Puncak Bendera and the start of vegetation again – something that will feel delightful after half a day in the desert-like wasteland of volcanic scree. You can be back down at Camp 7 in less than 2 hours from Puncak Bendera.
Day 3: It takes about 6 hours back down to the warung at Pos 1 where you can even buy a t-shirt or badge to celebrate completing one of Indonesia’s toughest yet most rewarding treks. Your guide should have arranged ojeks to meet you there for the journey back down to Kalibaru which takes under one hour. Thankfully there is phone signal at certain places on the trail so confirming a pick-up time should not be a problem. Once back in Kalibaru, why not treat yourself to a decent meal and drink at the Margo Utomo Resort restaurant?
Route to the crater rim only from Sumberwringin
From the actual starting point near Sumberwringin, strong hikers could reach the rim in just over 7 hours, requiring about 5 hours to descend. It is best to camp one night to enjoy the views.
From Sumberwringin (729m), it’s a 40 minute ojek or truck ride to the starting point in pine forest (1,205m). There are a couple of forks in the path near the start so a guide is a very good idea indeed. It is a long trail, but not especially demanding as the gradient is, for the most part, rather gentle. Raung itself is still quite some distance off, so the trail is actually very pleasant and gentle and it slowly leads you higher up the mountainside up through wild vegetation and scattered pine woodland. Look out for long-tailed black monkeys in this area. There is a nice spot to sit and rest for a while next to a cement trig (1,806m).
In the distance to the right (west) you should be able to see the large mountain of Argopuro rising above the clouds. To the left (east) is a smaller mountain called Gunung Suket, a nice shapely peak just a few kilometres from Raung itself. There are several spots to camp on the trail, but none of them are large enough for more than about 5 tents. They are also on slightly sloping ground. The best two are at 2,337m (no views but warmer) and 2,807m (colder but excellent sunset views over Argopuro). The latter is just 15 minutes from the treeline and would be ideal for anyone wishing to climb to the rim for sunrise.
Just beyond the treeline there is a small memorial (2,954m) presumably to someone who perished on the mountain. From here to the rim is about an hour of clambering up steep, bare volcanic rock. It’s pretty easy to climb up this way, but coming down you will probably need to use you hands in a few places to prevent slips and falls. To your left, between Suket and the side of Raung you might be able to spot the massif of Ijen-Merapi pushing through the clouds and the smaller mountain of Baluran inbetween.
Finally you will reach the edge of the crater rim (3,175m) and be rewarded with absolutely stunning views over the vertical crater walls. Take care here as a fall would mean certain death! The caldera is massive, and in the centre is a deep crater, approximately 400 metres across, which sometimes spews gas and rocks. The true highest point of Raung can be seen on the other side of the rim, over to the right (west). It is pretty much impossible to reach the peak from this side but you should be content with what is one of Java’s most amazing panoramas.
Bagging information by Daniel Quinn (last updated August 2017)
Trail Map
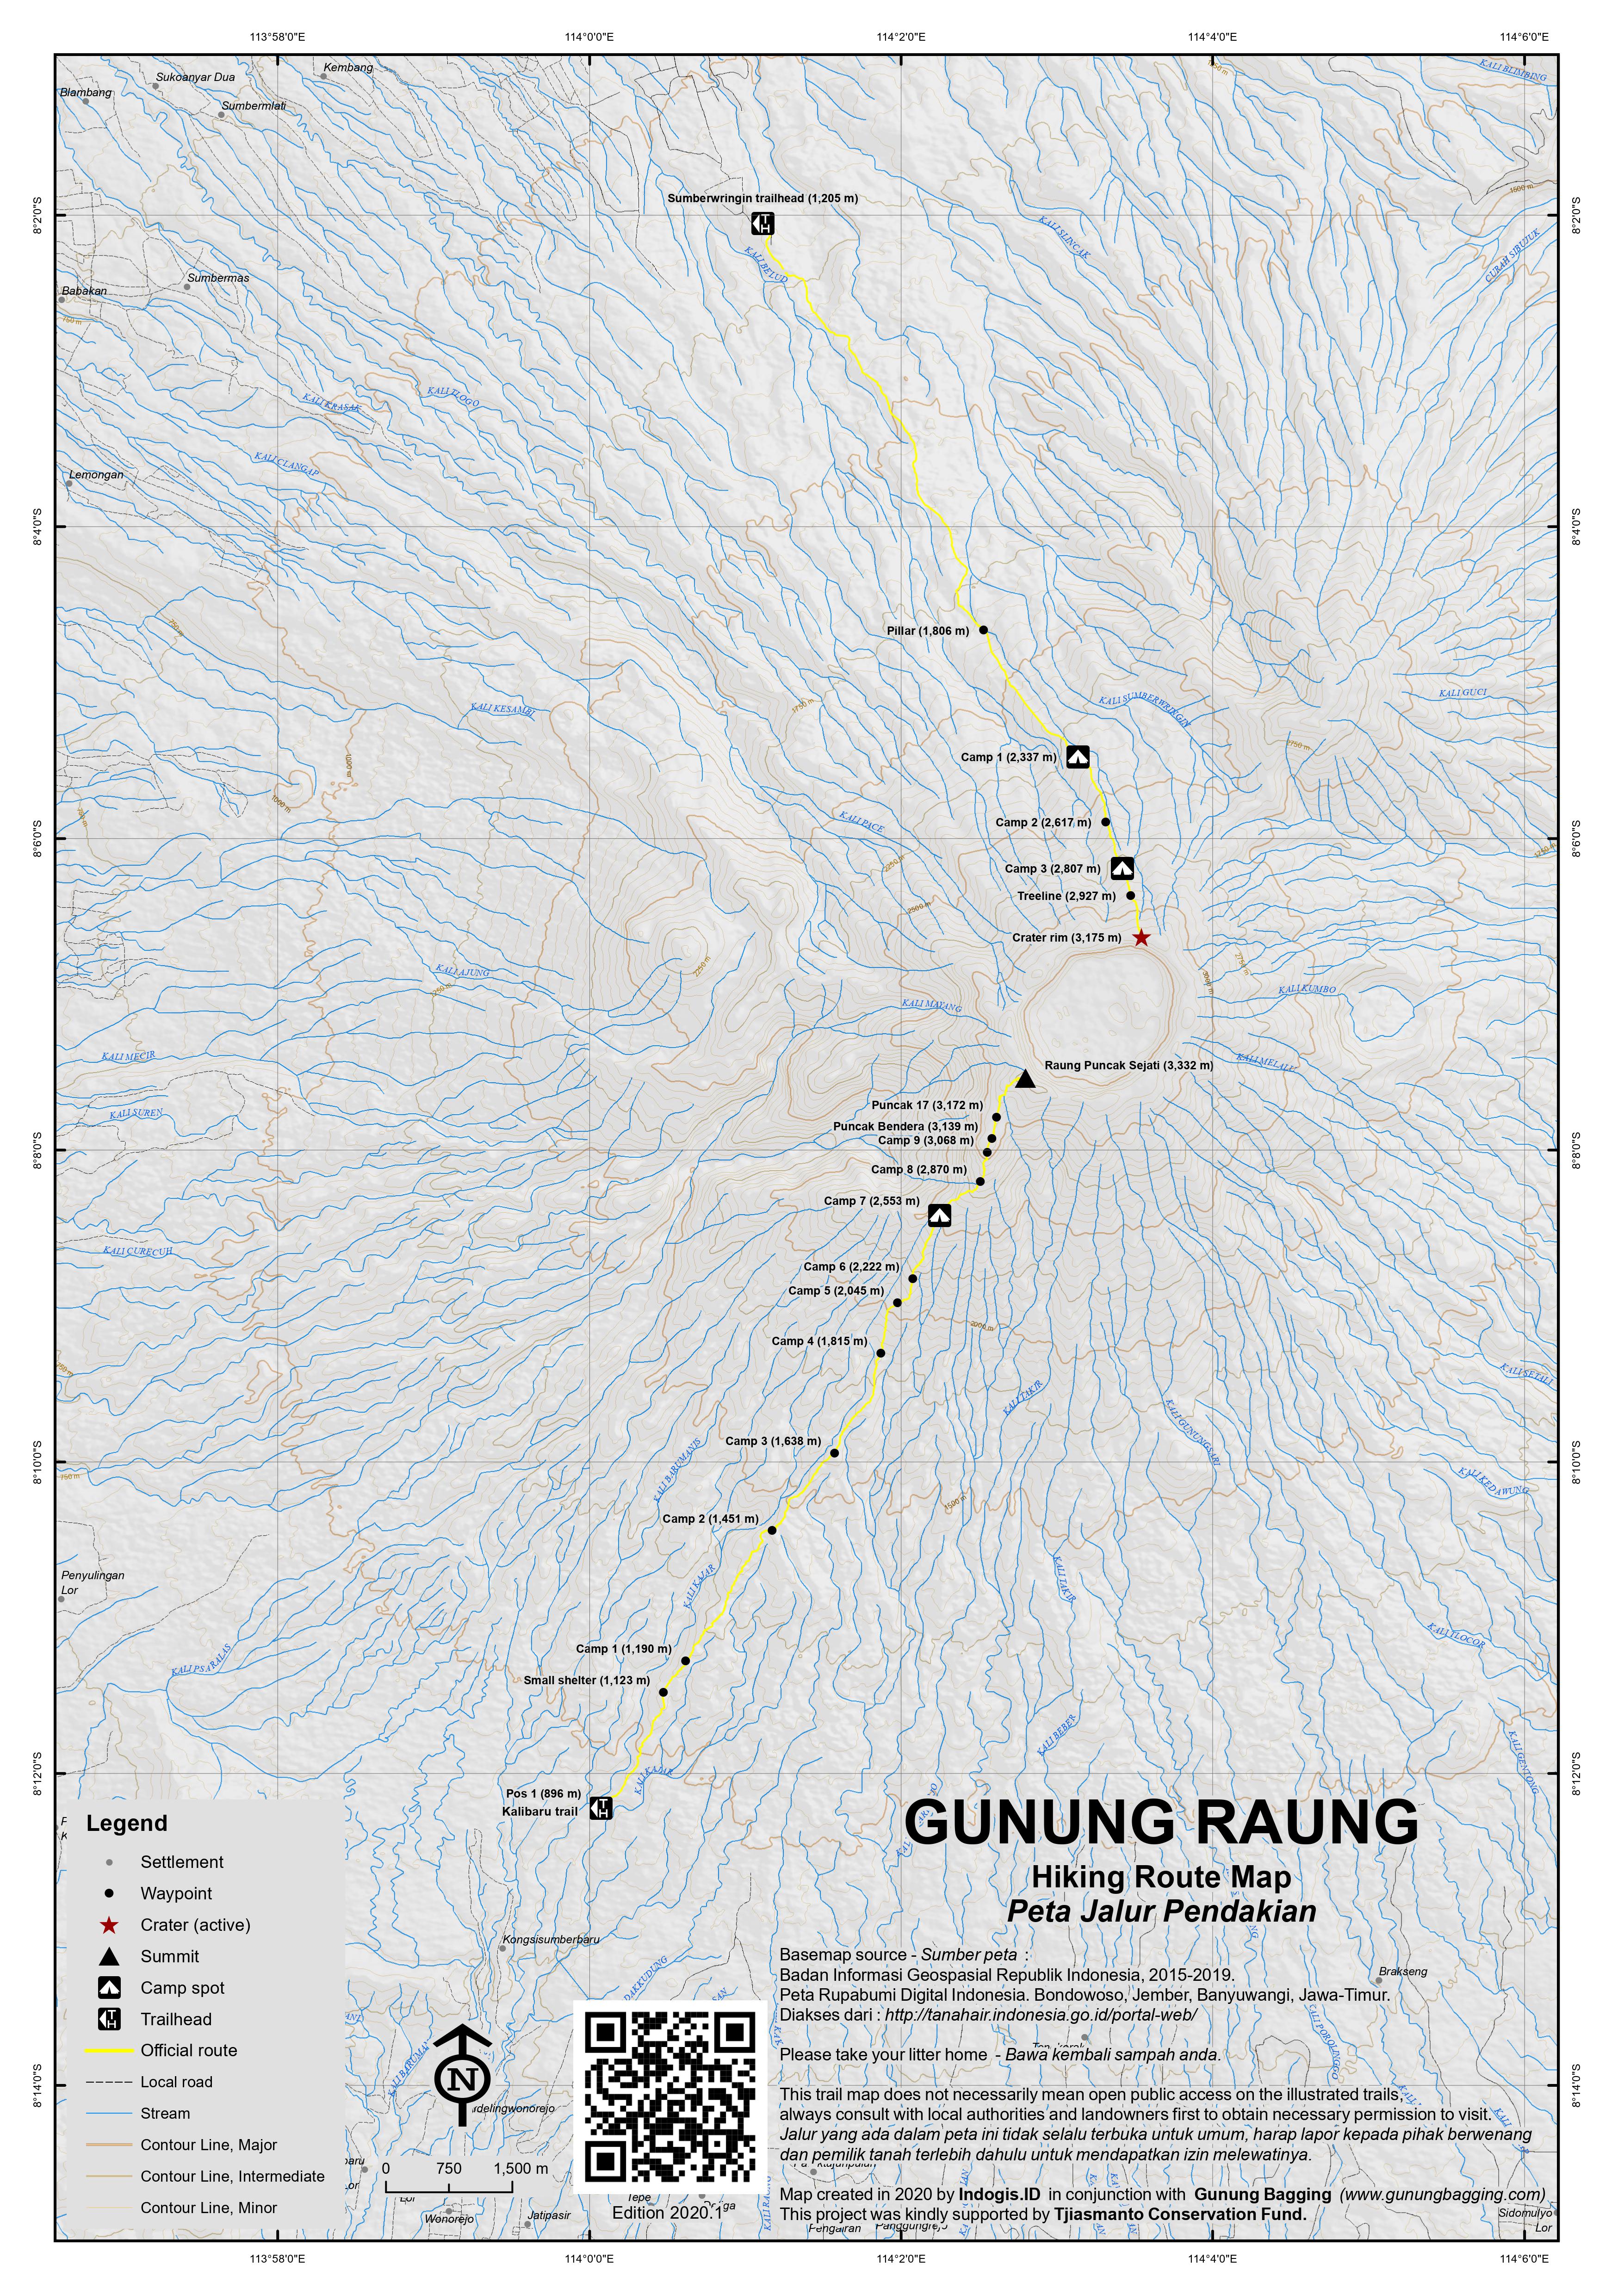
For a high quality PDF version of this and other trail maps, please download from our Trail Maps page.
Practicalities
- Getting there: For domestic flights from or to East Java, such as the airports in Surabaya, Malang and Banyuwangi, we recommend Baolau. The nearest airports are Banyuwangi and Jember (both about 90 minutes from Kalibaru). For the Kalibaru route, you can also take the Surabaya-Banyuwangi or Malang-Banyuwangi train and get off at Kalibaru. For the Sumberwringin route, head to Bondowoso, then towards Wonosari before turning up towards Sumberwringin itself.
- Guides and GPS Tracks: Want a PDF version for your phone? Looking for a guide? Need GPS tracks and waypoints? Gunung Raung information pack can be downloaded here.
- Trip planning assistance: Would you like Gunung Bagging to personally help you in arranging your whole trip? Please contact us here.
- Permits: For Kalibaru, register and pay Rp70,000 per hiker at Wonorejo. Make sure your guide has planned this in advance. For Sumberwringin, register and pay a small fee in the village.
- Water sources: There is no water available on either of the main routes so it is vital to take enough. For 3 days and 2 nights doing the true summit from Kalibaru you should take five 1.5litre bottles per person (one per day, plus one for cooking and one for emergency). It is a good idea to arrange a special water porter to drop this off at Camp 7 for you earlier the same day.
- Accommodation: Try the Booking.com map above or use this link to search for suitable hotels, homestays, resorts and apartments for your trip.
- We recommend Safety Wing as travel insurance for overseas travellers and tourists hiking up to elevations not exceeding 4500 metres.
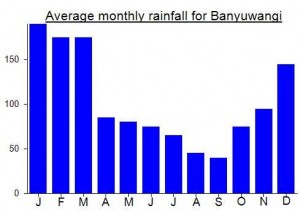
Local Average Monthly Rainfall (mm):
Location
Click on the blue arrow ![]() (top right) to see your current location on the map
(top right) to see your current location on the map
Origins and Meaning
The Roaring Mountain. To the best of my knowledge raung is not a standard Javanese word, so it comes either from the regional dialect of East Java, or from Malay-Indonesian or from Madurese. In any case its meaning is clear: “to roar loudly” referring to the noise emitted by the volcano during eruptions. (George Quinn, 2011)
Hiked Raung from Sumberwringin last weekend. I was with my 63 old dad. We used the service of Mas Faesol (https://www.instagram.com/achmad_faesol/) as a guide : price was 3,75J for 2 people including a night in Sumberwringin, 2 porters, all camping gear, food and water.
A bit pricey but they guys worked hard on the trail and to give us good service. As said below Mas Faesol is a bit slow (we were ahead of him for the whole hike) and speak poor English (we spoke Indonesian), but otherwise it is honest and organized everything well. We were quite happy to have everything arranged after coming directly after hiking Ijen.
This trail is obviously getting more popular as we saw many young Indonesian hiker there. There is little need for a guide to find the way, it’s super clear once you are at Pondok Ojek (motorbike can take you 3km further at a sign called “Batasan ojek”). It’s one way up to the summit, no way to get lost.
Plenty of Indonesian are hiking it as “tektok” as they say (meaning they don’t camp), most of them leaving in the middle of the night to reach the summit by sunrise. As the trail is straightforward, as long as you have water, a jacket and light there is no major difficulties.
It took us 6h to reach Pondok Mayit (about 2760m) from Pondok Ojek, including a long lunch break and a couple of shorter breaks. In the morning going to the summit from Pondok Mayit took us less than 2 hours. Around 40 min to get down to Pondok Mayit and about 3h to descend to Pondok Ojek. Note that as we hired porter, we had little weight to carry.
This mountain could be hiked for almost nothing if you just bring your own gear (tent/food/water) or if you hike it in the night and descend straight away. As most mountains in Java, Raung was getting covered in cloud usually from 10am. Just show up at one of the base camp (look for Bc pak Nely for instance), register (100 000k foreigners) hire an ojek (100 000k one way) to get to the trailhead and just walk.
Another guide I contacted gave me the detail for rates :
– Guide 900k for 2 days 1 night
– Porter 650k for 2 days 1 night
– Ojek 200k per person (round trip)
– Registration (foreigner) : 100k
There is little need for a guide, porters are enough honestly. Level of English spoken is close to 0 though.
Views on the summit are stunning, one of the most impressive you can get in all Indonesia
So having Guide is not mandatory? But If I don’t hire Guide, are they renting harnesses and ropes that are essential for summit push? Also, I wonder if they allowed Soo hike. I’m Indonesian btw.
First off I just want to give a big thanks to the admin of Gunung Bagging. This page has helped me immensely on my Indonesia trip and attempt to summit all the 3,000ers. It’s saved me so many hours of planning and researching on my own and I’m sure many other travellers as well.
I summited Raung on 23/7/24 via Sumberwrigrin. I thought I’d write up a report as the last one was over two years ago. I didn’t use a guide and had no problem at the base camp, which is located at “Teduh Glamping” resort on Google maps. I paid 100,000 rps entrance fee and the guys let me leave a few bags there while I spent the night on the summit. I took a 100,000 rps ojek ride (one way) to pondok ojek (pos 2) past pondok motor (pos 1). I miscalculated time pretty poorly and didn’t realize I had to climb over 1,400 meters to the camp I wanted to sleep at. If I would have paid better attention to those details, I wouldn’t have started hiking at 2pm. It took me a little less than 4 hours to reach Pondok Mayit (pos 6), which is where I camped for the night. The trail is very overgrown and steep, especially from pos 3 to pos 6. Pay attention to the trash and red tape tied to the trees marking the trail and you won’t get lost. I was the only person on the mountain aside from the coffee plantation workers below pos 3, which was both amazing on the summit but a little scary in the night camping alone. I originally wanted to camp at pos 7 but it was dark when I got to pos 6 so I set up camp there. From camp to the summit it took about an hour and a half. After the treeline the trail gets quite precarious and there are many sections in which you are walking on a very narrow rocky path with decent exposure on both sides. Do take care on these sections, if you are not experienced I would recommend hiking with a friend or guide. There was A LOT of gas at the crater and I wished I had some sort of mask so I could enjoy my time up there longer. I was short of breath from all of the toxic gas, so I didn’t stay at the summit as long as I’d have liked. But being the only person at the top was magical! It took me about 3 hours to descend back to pos 1.
Mind you I have a lot of experience on mountains and am a very fast walker, usually taking only half the amount of time quoted on Gunung Bagging. Keep this in mind when reading my time estimates! Overall an amazing experience if you want some real solitude and adventure on a mountain.
Overview:
Climbed to the crater rum of Gn. Raung on 06 to 07-June-2022 via Sumberwringin.
Climbing: ~30 minutes ojek ride from the village to Pondok Motor + an easy 7hrs. to Pondok Mayit for camp. + 2 hrs. to the crater rim the next morning.
Decent: 1.5 hrs. from crater rim to Pondok Mayit + 4.5 hrs. back to Pondok Motor.
Trail: The trail was seriously overgrown in many places and there was no water available along the route. While this was one of the most manageable accents among the 3k+ peaks in Java, a guide is nonetheless recommended due to the very overgrown state of the trail.
Other: The crater is amazing and the hike is absolutely worthwhile. However, prior comments regarding the pristine nature of this trail seem to be sadly obsolete. The trail, despite being extremely overgrown, had notable amounts (in some cases full bags) of trash at most posts, undoubtedly left behind by a minority of hikers who less intelligent than their walking sticks.
Stats:
Climb time: ~9hrs
Descend time: ~6hrs
Water used: 6.5L
Min temp: Well below 20deg C at night
Guide used: Yes
Registration required: No
Costs: 300rb (ojek ride round-trip for 2 ppl) + 500rb (guide, not including tip)
Guide:
My guide (IG @achmad_faesol) was great- very helpful and hard-working on the trail. Would absolutely recommend. Cost was 500rb + tip and ojek ride for 2d/1n, including tent + stove rental.
The admin of this website should delete all this information about these guides in the comments. Just a few days ago I have climbed Mt. Raung with the guide mentioned above and I have had a bad experience. First of all the guide did not speak nor understand any basic english! He was also very very slow and arrived 3 hours later at the camp 6 while I was waiting for him with the porter. The guide also did not carry a medical kit and it has been a very frustrating experience not be able to communicate. The price was 2.500.000 IDR . Make sure your guide speaks english as this guy fooled me by using google translate while communicating on whatsapp
Mr…. Is me kang Jarwo. I new contact 085333443344. And I email this republik. raung3344@gmail.com
I had a great trip up Raung this weekend. I hired Raung Trip the owner/guide Simon has excellent English and was in great shape.
I flew to Surabaya and took the train overnight to Kalibaru. The trip was 17h on trail over the span of two days. The only real “technical” section was a 5m pitch of exposed class 3. I opted not to use a rope for some of the other easy “pitches”. Yawn.
Views from the summit are SPECTACULAR. Having the peak to myself was priceless.
Hey Doug, do you have the contact information of Simon?
I tried contacting Kang Jarwo but his whatsapp is inactive.
Kent,
Did you manage to get a guide for your trip? I’m planning on organizing one.
Thanks.
Hy Kent i am Simon (owner of Raung Trip) you can contact me for information about Raung mountain
Sorry Simon but I will not be publishing your email address. I find it quite bizarre that trip organizers think they can use websites such as this to find customers free of charge. A huge amount of time and effort has been spent on this website over the years. Thousands of hikers benefit, thousands of guides benefit. But neither group wishes to assist financially in supporting our platform. If you wish to reap the benefits of our hard work putting this site together, you are welcome to pay for a proper advert by contacting us via the contact page. Many thanks, Dan.
Hi Doug,
Is it absolutely critical to have a rope? As you said you only used it on one section?
Also did you just camp one night and then to the summit and back the following day?
Bagged Raung (or at least made it to the crater) via the Sumberwringin route over the weekend.
Flew to Banyuwangi and Pak Benny sorted the 5 of us out with transport very well. He is quite expensive but speaks great English, was super helpful during our hike, and there aren’t many other options from Banyuwangi! Number is +6287806667131.
Drive is 2.5 hours to the registration point, then 50k entrance for any nationality. Interestingly they only get 50 people a month climbing and one of our group was the first ever South African! Great food served up also. You then find Pak Habibi and his crew and pay another 50k for a 40 minute bike ride into the wilderness, which is an adventure in itself.
It took us 4.5 hours at a decent pace to reach the camping spot at 2,600m. The first 1.5 hours is through thick but relatively flat forest, although with a few confusing forks in the path (generally take the right fork). This was followed by 1.5 hours or more challenging climbing through seriously overgrown bush until you reach a marker for 2,200m which is the first camp spot. The next 1.5 hours is more enjoyable and eventually you get above the clouds, although by this point you are fighting through thick overgrowth.
The camp spot is on a perfect area of flat land with a sensational view over neighbouring volcano ranges and Semeru in the distance. You can;t miss it.
We left the camp spot at 4:30am to reach the crater rim, taking 1hr10 total. 35 minutes to reach the treeline, then the rocky climb begins from the grave of a presumably killed climber. Views at the top are sensational and the crater is unfathomably large. What’s even better is that there is no one up there, so no jostling for photos or struggling for the best spots. We absolutely loved it and surprisingly was not that cold (only 3,200m I guess), then down to camp spot for breakfast.
The walk back in all honesty was pretty bleak. We ran out of water quite soon and once you get to about 2,200m there is nothing to look at other than thicket. We bolted down and did it in 3.5 hours but were all very dehydrated by the end. Luckily we had text ahead so Pak Habibi came to the rescue with banyak air.
Overall great walk, really good views and very different from some other volcano hikes. Just pretty remote and a bit monotonous at times.
Some tips;
– Bring enough water. We each went with 3 litres and it wasn’t enough.
– Wear some form of skins for your arms and legs otherwise you’ll be cut and in rashes.
Successfully reached ‘Puncak Sejati’ via the Kalibaru route this month with great help from Guide Kang Jarwo of Basecamp Adios Pala (‘goodbye nutmeg!?) in Kalibaru and his excellent friend Robby. They are strong, well-organised and experienced and will take care of everything…. permits, transport (make sure you ask for ojeks to and from Pos 1 to save time), helmets, ropes and so on…. Jarwo also has a unique vehicle with a buffalo skull attached to the front of it! An excellent way to ride around town!
To/from Jakarta or Bali you really need 5 days in total…. 3 full days for the actual hike and one either side for getting there. You can now fly direct from Jakarta to Banyuwangi (Sriwijaya air) but as I was in Surabaya I flew to Jember (possible with both Garuda and Wings) … a tiny airport which is currently being developed. There I got a taxi to Kalibaru for Rp200,000. It took about 90 minutes.
Kang Jarwo’s friendly family house is about 700 metres from the railway station so you could also make use of the train services to get here. Me plus two other hikers stayed here for the night so we could get an early start the following morning (i.e 4am). The evening before we went to the swanky Margo Utomo resort which is just behind Kalibaru train station but feels very secluded…. great restaurant, cold beer, and traditional music and dance performances sometimes. A lot of foreigners come here on coach tours from Bali and you can see why – would be a great place to stay for those with a bit extra cash – but quite unexpected for Kalibaru.
The place to register before starting the hike is Wonorejo… about 20min by ojek from Kalibaru. Rp70,000 per person (probably for foreigners… may be cheaper for locals). It is then about 30 mins further to Pos 1 which is where most people start the hike if they want to complete it in 3 days. There is very little litter but the trail is clear – you will probably meet another team or two of hikers but this route is still far from busy, especially when compared to most other routes in Java. You will probably hear hornbills and wild boar and see lots of other birdlife.
The place to camp is known as Camp 7 and it will take 6-8 hours to reach including breaks. Good views of Argopuro. Watch out for the musang (weasel / civet cat) which is not afraid of humans and indeed got inside my tent and stole my bread! The guides caught it and kept it in a bucket until we left camp on the final morning!
Second day of hiking requires another pre-dawn start so you can make the most of the daylight hours doing the technical bits beyond Puncak Bendera, which is where the vegetation ends and the tricky, exposed sections begin, We were very lucky with the weather – in poor conditions it would not be advisable to continue. There are about 3 sections where ropes are normally used – all fairly short sections but with considerable exposure. I have to admit to thinking we might only have a 50% chance of success but Kang Jarwo and Robby inspired confidence and all of us reached Puncak Sejati. My lips got a bit sunburnt as because we were wearing helmets there was no shade available from my hat! Stunning views from the summit as you might expect, but cloud does tend to roll in by lunchtime so you want to be heading back down no later than 12 noon. Kang Jarwo once camped at Puncak Sejati and spent a day descending into the crater and back out again! For mere mortals, carrying a big backpack this far would be really tough, let alone abseiling down to Raung’s crater floor! When we were up there, one hiker from Bandung conducted a peculiar ritual in which he set fire to a wedding photograph!
We had another night at Camp 7 before letting the musang loose and descending to Pos 1 (about 6 hours including a couple of short breaks) and getting ojeks back to Kalibaru, beers and food at Margo Utomo and then an evening train to Karang Asem (Banyuwangi).
There is another basecamp/guide for this route in Wonorejo (near where you register) but I would recommend contacting Kang Jarwo in Kalibaru first to see if he is available as he and Robby are brilliant. 0878 5727 2111. It costs a bit more because of the technical skills and equipment needed so ideally you want a group of 3-5. Any more than that and the roped sections will take ages as people have to do them one by one. I am no expert with ropes but managed ok for the most part so I encourage people who are not experienced to give it a try (but great care is needed in a couple of places). If you can do a bit of preliminary training it would be very useful.
According to local guides the summit is 3,344m but both our GPS devices registed around 3,336m at the top so the previously published height of 3,332m will stay for now.
Definitely one of the best treks in Indonesia.
Gunung Bagging will almost certainly be climbing to Raung Puncak Sejati (the true peak) from Kalibaru this year August 9-11. 4 places left – get in touch ASAP if you are interested. This trail involves some roped rock climbing. Danpquinn@gmail.com
I am keen on climbing Agung Raung as it has a special place in my psyche after it resulted in multiple cancelled flights for my family last year.
I will be able to get to Sumberwringin from Banyuwangi As I will travel from Bali (I imagine at a ridiculous cost).
It’s at Sumberwringin where I have issues. Are there many guides and is it wise to just expect to find someone on the day. Also is it easy to arrange transport back from the crossroads as I don’t fancy walking when I will be on a reasonably tight timeframe.
Also if someone who has done the hike in the last few years who could advise on an approximate coat it would be appreciated (I will be going alone).
Cheers
Paul
Why dont you go to the true summit? Gunungbagging is not really up to date concerning Gn. Raung. The trail to the true summit is good. You need a guide for the last part because without guide it is possible to miss the right way and most probably you will not know what is the summit and where to go. A rope is necessary. There is at least one step through very loose steep material which I would not do without rope. Have fun! Gunung Raung is one of the best hikes on Java.
Gunungbagging is really a fantastic site. But that the tour to the real summit is not well described is strange (taking into account that for nearly all other mountains the way to the summit is described in quite a detailed way). I climbed Gunung Raung last weekend from Kalibaru to the real summit. It is the second best hike i have made on Java (after Semeru). Absolutely recommendable. And it is a real mountain, where you have to be careful.Going with a guide is absolutely necessary. Without guide it is practically impossible to find the right steps in the upper part where no trail can be seen. There are some metal hooks that could help, but do not try without rope!! There are some place where ropes have to be applied. Carry also helmet because loose stones can fall down on the slopes that are really steep. If you feel confident about your physical condition you can do the tour in two days. However, if you dont have much experience take three days. There are groups that even take four days. The latter is very exaggerated. But in two days it is really a hard tour, much harder than Semeru in two days. There is no water. So take five liters for a two-day tour with you. The trail is quite good (until it disappears in the last part). It is very long. The tour starts normally from pos 1 (dont start from basecamp, this costs you several hours). From pos 1 to the summit you have about 21 km and 2450 m height difference. It is convenient to go the first day to camp 7 (be careful, they distinguish between pos and camp, which may be a bit confusing). Camp 7 is at 2575 m. What is beautiful is that there are nit so many people on that mountain and that the trail is quite clean. Maintain it clean! Ok, good luck then and remember: dont even think in going without local guide.
Hello Matthias.
“Not well described”. Correct. There’s nothing ‘strange’ about this though, other than your own expectations of a free resource. Like most users of the site, and of most information sites on the internet in general, I imagine you have donated absolutely nothing towards the upkeep or development of the site, therefore you have no real justification for complaints. If you haven’t contributed, you have no grounds for criticism of this nature. You have happily taken more than you have given, by using the information available on Gunung Bagging, which has taken many, many hours to create.
I would happily climb to the true summit and write an account, but I live in Scotland at present. To maintain and develop the site costs considerable amounts of time and money, both of which are in short supply.
hi !
do you know if we can see lava near Raung volcano because of éruptions ?
i cannot climb mountain, i just try to see lava around it.
I’m in Bondowoso now and i don t know how i can go and see lave.
Thanks to answer me !
thanks for your website
Jenn
Raung erupts, several airports closed.
http://www.thejakartapost.com/news/2015/07/10/holidaymakers-stranded-volcano-closes-bali-airport.html
http://www.bbc.co.uk/news/world-asia-33473679
Hi,
As this is my first comment on gunungbagging.com, I’d like, fist of all, to thank and congratulate Dan for the great and useful website.
I climbed Gunung Raung a few days ago. I arrived to Raung Camp in Sumberwringin at 3pm and after register went the 7km to the trailhead by ojek (50.000). I started to walk at 4pm and reached the camp named as waypoint “cement trig” at 1800m after 2/2.5 hours and having walked the last part with a headlamp.
After spending the night there, I walked 3 more hours to the crater on the next day (taking only a small backpack with water and snacks)and after some time for pictures and enjoying the view I walked down to the “cement trig” packed and walked all the way down to Raung Camp in Sumberwringin.
The path going to Gunung Raung is one of the most “uncomfortable” I have ever hiked. Grass overgrown on the path, fallen trees, branches that continuously hit your head, arms, legs… hook your clothes etc, and make impossible the use of hiking poles.
To me camping in the “cement trig” was the best option, as after having seen the path that continues up to the summit, it would be very uncomfortable to walk that part with a big backpack.
I brought with me 6 liters of water for the 24h that took me to go and back and 2 more liters would have been better.
As said before, this path seems to not to be much used and it is clean compared to other hikes in Indonesia. Please keep it clean, bring a 500ml empty bottle with you to use as a garbage bin. All your food wraps, even the part you tear off, cigarette butts, tissue after going to “toilet”, batteries, etc can fit in there… you would be surprised. And avoid cans and other food “containers” that you cannot put inside the bottle unless you take them back with you. Please avoid increasing the amount of litter in Indonesia’s beautiful Nature.
Hi again, I forgot to tell you that I logged a new track of Gunung Raung using waypoints from GunungBagging track and you can find it and download it from wikilic.com (my user is pedro2)
Sorry, track log on http://www.wikiloc.com
I just climbed Raung. What a treat. Travelled over from Banyuwangi via Ijen-Merapi by ojek. Found that the “base camp” in Sumberwringin is undergoing a complete makeover – it seems they are planning to turn it into some kind of hotel
Took the ojek ride (now Rp 50,000) up to the starting point at 1200 metres. Missed a critical right fork at around 1400 metres, and wasted an hour hiking in completely the wrong direction. Luckily I met an old guy heading down the mountain after a morning chasing wild pigs, and he set me on the right course. Camped at 2330 metres, as I was alone and nervous about continuing any further in the dark. Set off for the summit at 5 a.m. and reached the crater rim at around 7.30 a.m.
As Pedro mentions, the first four hours are tedious in the extreme – endless jungle bashing along an often barely discernible path, with precious little altitude gained in return for great amounts of energy spent. It is only after the 2000-metre mark that the mountain begins to reveal itself – and what a revelation! At 2500 metres the crater wall looms ahead, and from that moment on, one can only surrender to the mountain, drawn upward by some invisible force, until the crater rim is attained. Some fifty metres below the summit, a hiker from 1984 has painted a eulogy to his “lover”, the mountain, on to the rocks. The words are a fitting tribute; for this is not a mountain to be “bagged”, but to be embraced. It is a place of awe-inspiring beauty. To have gazed across the crater of Gunung Raung is a sheer privilege – and an experience that no hiker is likely ever to forget.
Thanks for posting your tracklog on OpenstreetMap. How do I actually get your tracklog from Openstreetmap? I have surfed around but to no avail. I am planning to do Raung in May 2011. http://itanyar.com/1309/kumpulan-gambar-gerak-naruto-terbaru-junli-2015/
Anybody knows if G Raung is open for hiking now?
The alert level for Raung has just been raised
http://www.thejakartapost.com/news/2012/10/23/mt-raung-s-status-raised-alert-visitors-maintain-3-km-distance.html
I posted this report on Raung, including how to get there, on the Lonely Planet Thorntree back in 2008.
http://www.lonelyplanet.com/thorntree/thread.jspa?threadID=1670088
Some extra detailed info courtesy of Teddy and Juri…
Approached by angkot from Bondowoso to Gerda Atak (3000 Rp, on Situbondo road) and by another angkot from Gerda Atak junction to Sumberwringin (5000 Rp, beware of overcharging). Base Camp is located in Sumberwringin village in a futuresque, round building with friendly stuff, the only exception being, that room prices are fixed by the authorities to ridiculous 150 000 Rp (double, WC outside). However, there is a small house nearby, where they might let you sleep for free, in case of unwillingness to inhabit same mentioned rooms. Distance to trailhead is 7 km and ojek price is standard at 30 000 Rp. The right fork before the antenna is about 300 m from Base Camp and after that one continues on the good asphalt road for another 2 km. There you take the left fork into a cobbled, bumpy road (small sign) for another 4 km through forrest and agricultural land. Ignore the small junctions on left and right and follow the cobbled main road.There is one more junction before the trailhead, where you can either turn left (don’t do it), turn right (and stay on the cobbled road) or go straight forward through the forrest (a shortcut, which after 10-15 minutes meets the road again). 10 minutes along the road lead you to the parking lot, which is the trailhead at around 1250 masl (sign – puncak). After you hit the trail, it is easy to follow. Stay on the main path through the agricultural land on the lower slopes and eventhough it gets overgrown at some places higher up (for short distances), i could not observe anymore forks and places with lots of options or question marks. There is absolutely no water on this north route, except the dew at morning time. Camp place (Pos 4) at 2350 masl is big enough for lots of tents and even has the remnants of a wooden shelter, but in case of sufficient time and willingness – the landscape and the views are far superior at 2800 masl (no real Pos numbering sign, but big enough for 3-4 tents), short distance below the tree line. A night here would be the preferable option also for a sunrise glimpse from the crater area next morning.
I uploaded the track of the Sumberwringin approach on http://www.openstreetmap.org
Thanks for posting your tracklog on OpenstreetMap. How do I actually get your tracklog from Openstreetmap? I have surfed around but to no avail. I am planning to do Raung in May 2011.
You can request the free Openstreetmap Garmin file for Indonesia via this link:
http://garmin.na1400.info/routable.php
Once your request has been processed the server sends you a link to download the file.